Home Warranty
How to Clean Your Oven Range Filter
It's important to keep your oven range hood filter clean and do regular maintenance. Learn how to clean your oven range filter and why it helps.
It's important to keep your oven range hood filter clean and do regular maintenance. Learn how to clean your oven range filter and why it helps.
How often do you clean your oven range hood filter? Be honest, now – have you ever cleaned it? Your oven’s range hood handles a lot of exhaust and, if you haven’t cleaned it in a while, it could be clogged up with greasy, sticky residue.
With the holidays upon us, it’s time to clean your oven range hood filter. You need to know how to clean it, just like you need to know how to clean your gas stove burners or make basic repairs to your electric coil stove. Read on to learn where to find your oven range hood filter, how to remove it and how to clean it.
Gather Your Materials and Locate Your Oven Range Hood Filter
Any good house cleaning requires the right materials. Start with a sink full of hot, soapy water – heat a large pot of water to boiling on the stove before pouring it into a stoppered sink basin. The steam from the boiling water will begin to loosen the gunk baked onto your oven range hood filter, and you’ll soak the filter in the boiling water to loosen hardened grease and gunk a little later.
You’ll also need a nonabrasive scrubber or brush; some ultrafine steel wool; some degreasing soap, like dishwashing liquid; baking soda; and, if you prefer, a pair of gloves. Add a healthy squirt of soap and about a quarter cup of baking soda to your sink of hot water. Stir until the water is sudsy and the baking soda is dissolved.

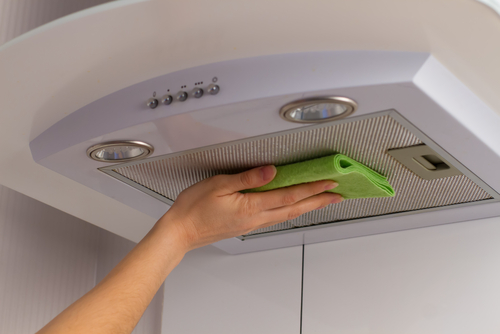
Remove Your Oven Range Hood Filter
Your oven range hood filter is a metal grill that attaches to the bottom of your range hood. You may need to remove it from the underside of your range hood with a screwdriver, or it may slide or pop off.
Drop the metal range hood filter into the hot, soapy water and let it soak for about 20 minutes. In the meantime, check for debris and residue on and around the fan inside the range hood. Clean around the housing and turn the fan blades to ensure that they are working properly and can move without obstruction.
Checking for problems with the fan and the wiring leading to it can help you maintain your oven range hood and extend its life.
Thinking about coverage?
Sounds like a plan. Find the warranty that fits you best.
Clean the Filter
Once the range hood filter has soaked for 20 minutes, the boiled water should be cool enough to touch, although you can wear a pair of rubber dishwashing gloves for this part if you prefer. Use your nonabrasive brush or scrubber to remove any remaining grease or residue from your oven range hood filter.
Put some elbow grease into it, especially if you’ve never cleaned your oven range hood filter before – grease builds up on the filter easily, and if it hasn’t been cleaned in a while, there could be a lot of it. You may want to use some ultra-fine steel wool to gently scrub away stubborn spots, but take care not to scratch the filter itself.
Now that you’ve cleaned your oven hood range filter, you can dry it and reattach it to the underside of your range hood. You should clean it at least every six months, maybe more often if you do a lot of cooking. At the same time, you can perform other basic oven and range maintenance tasks, like repairing faulty stove burners, cleaning underneath your cooktop, cleaning debris out of the burner gas valves, cleaning your oven and troubleshooting problems with your oven.
Preparing holiday meals and baking holiday sweets can put your oven and cooktop under a lot of strain, so it’s important to make sure your oven range hood filter, cook top, and oven are clean and in good working order. Performing basic cleaning and maintenance on your oven, range and range hood now could prevent inconvenient breakdowns later.
Help for Unexpected Repairs
While cleaning your oven range hood filter, you might come across some needed repairs and maintenance tasks that require a professional touch. That’s where the added peace of mind of an American Home Shield® Home Warranty comes in handy. Our home warranties cover up to 21 home systems and appliances, including ovens and stove ranges. Call American Home Shield today to sign up for coverage.

If you’re already an AHS member, we’re here for you when you need us. If you have range hood issues, and your range hood is covered under your home warranty, then you can request service in MyAccount 24/7. Not sure if your range hood is covered? You can also find that out in MyAccount.
AHS assumes no responsibility, and specifically disclaims all liability, for your use of any and all information contained herein.
Have a plan for your home when things don't go according to plan
Shop Home Warranties