

  1. AHS
  2. Blog
  3. Quick Home Tips
  4. How to Fix a Washing Machine Not Draining
Inside of a washing machine

How to Fix a Washing Machine Not Draining

After finally deciding to tackle that mountain of laundry once and for all, spending precious time separating your colors from your whites, and proudly loading your washing machine, you find yourself hit with one of life’s inconveniences: your washing machine won’t drain.

Along with stubbing your toe and getting stuck in traffic, a washing machine not draining is one of those seemingly minor things that can ruin an otherwise good day. After all, it’s frustrating when you go to transfer a load of clothes from the washer to the dryer, only to encounter a deluge of water remaining in the washer tub after the cycle has finished.

If your washing machine won’t drain, we’re here to help. Learn more about the function of your washing machine drain and how to drain the washer on your own.

Why Won't My Washing Machine Drain Water? 

A washing machine not draining can have multiple causes, including a clogged or jammed drain hose or a broken pump, lid switch, or belt. No matter the culprit, you need to drain the water from the washing machine before diagnosing the issue or doing any work to remedy the situation. 

What Does the Drain Function on a Washing Machine Do? 

A washing machine’s drain function removes water from the tub during the spin cycle. The washer pump forces water from the bottom of the appliance into the drain hose. The washer drain hose loops to the top of the machine and then down to the drain, enabling the tub to fill. When the water reaches the bend in the hose, it goes out of the drain.

How to Drain a Washing Machine Manually

If your washing machine is not draining completely, the mechanics of draining the water is up to you. Here are a few ways to manually drain the water in your washing machine: 

  • Bail it out with a bucket: Bailing out the water with a bucket, cup, or bowl is often the go-to strategy for most people who find that their washing machine won’t drain. However, this technique can be time-consuming, tedious, and hard on your back because you have to bend over repeatedly to scoop up water from the bottom of the machine. 
  • Drain it with a hose: This is an easier way to drain water than bailing it out with a bucket because you’re using the drain hose and letting gravity do the hard work for you. To drain your washer with the washing machine drain hose, you’ll need a bucket, a screwdriver, needle-nose pliers, and a clamp. It’s also a good idea to have a sponge and towels on hand in case of a spill. 

Follow these steps to drain the water with the drain hose.

Step 1: Turn off the power.

Make sure that you unplug your washer from the outlet or turn off the power at the circuit breaker or fuse box. You may also want to turn off the hot and cold water connections to the washing machine, just in case.

Step 2: Find the drain hose at the back of the washing machine.

The drain hose resides behind your washer and connects the washing machine to your exterior washing machine drainpipe. If your drain hose is bent or has a kink, it may block the water flow. If this seems to be the issue, simply straighten the hose. 

If it does not appear to have a bend or kink, your next step is to disconnect it from the washing machine drain. If necessary, unscrew the hose with a clamp attached. Always keep the hose higher than the washer tub until you’re ready to empty out the water.

Step 3: Set up the bucket and drain hose.

Ensure that the bucket is in a place where you won’t accidentally knock it over; you may want to place it firmly on or between several towels. Then, drop the house lower than the washer tub and into the bucket. If the bucket fills up, simply raise the hose back above the washer tub until you can empty the bucket. Drop the hose to start to fill it again. 

If water doesn’t flow freely from the washing machine tub through the drain hose and into the bucket, the filter may be blocked, so you’ll need to clear it before continuing. 

Thinking about coverage?

Sounds like a plan. Find the warranty that fits you best.

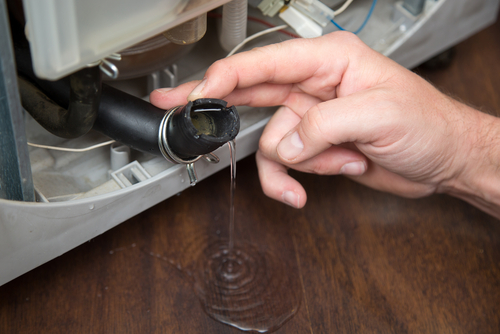
Step 4: Check for and remove all clogs in the drain hose. 

Once the water has fully drained out of the tub, check the drain hose for any debris, clothing, or soap blockages, all of which can make the washing machine drain clogged. To check for clogs, loosen the clamp connecting the hose to the bottom of the tub, then inspect the inside. If you see something blocking the hose or its connecting parts, remove it with the pliers, then reconnect the hose. 

Step 5: Check for deeper clogs in the drain or beyond.  

If your investigation shows that the drain hose is clear, that means that there may be a clog in the drain or beyond. You will likely need to use a plumber’s snake or call a professional to clear deeper clogs.

Step 6: Inspect the washing machine drain pump.  

The next step is to check the washer pump to see if it has a clog, a broken belt or impeller (if you have a top-load machine), or a leak. Read through the washing machine manufacturer instructions, which should include a diagram of your unit’s drain pump location and components. 

Usually, if the drain pump isn’t working properly, you’ll hear an unusual noise or notice leaking from the washing machine when it is running. If your pump is malfunctioning, you’ll need to replace it yourself or call a professional to replace it for you. If you do replace it yourself, make sure to purchase the same pump model so that it properly fits your washing machine.

Step 7: Inspect the washing machine lid switch.

Try depressing the lid switch by hand to see if it is working. If you don’t hear a click, that may indicate you have a broken switch that needs replacing.  

Step 8: Inspect the washing machine belts.  

If you have completed every step and still find that your washing machine won’t drain, check if damaged belts are the cause of your drain problem. The manufacturer’s washing machine instruction manual should indicate the location of the belts. To check your belts, unscrew your washing machine’s access panel and check the main belt and the pump belt. Be on the lookout for any corroded, broken, or otherwise damaged parts. 

Step 9: Inspect the drain vent.

A washing machine drain vent allows air into the machine. It can help prevent the creation of a vacuum that might prevent water from draining properly from the washer. If there is a gap around the drain hose where it enters the drain, you may not need a vent. You should have a vent if local building codes require one or for proper draining if your washer is more than four feet from the vent stack. 

Step 10: Use your home warranty coverage.

If you’ve followed all of these steps and your washing machine still won’t drain, it’s time to call in a professional plumber or washing machine service technician. This is when complete home warranty coverage with American Home Shield can help. With our ShieldGold™ and ShieldPlatinum™ plans, you can enjoy a washing machine warranty.

Laundry_4.jpg

When your machine breaks down in the future, don’t pay expensive out-of-pocket costs by scheduling a repair person. Home warranty coverage helps reduce the cost of repair or replacing parts of your covered household items—and gets your home back up and running in no time. With comprehensive coverage and flexible pricing and plans, a home warranty plan with us means budget protection when your washing machine won’t drain. Learn about an American Home Shield® home warranty.

Read more about how to solve common washer and dryer problemstips for washer and dryer maintenanceand how to know if you need a washing machine drain pan.

Share:

AHS assumes no responsibility, and specifically disclaims all liability, for your use of any and all information contained herein.

American home shield short logo mark

Don't worry. Be warranty.

Have a plan for your home when things don't go according to plan

Shop Home Warranties