

  1. AHS
  2. Blog
  3. Repair & Maintenance
  4. How to Reset Your Garage Door Keypad
garage door keypad
garage door keypad

How to Reset Your Garage Door Keypad

Learn how to troubleshoot your faulty garage door opener keypad so you don't have to waste time and energy trying to break into your own house. Just follow these easy steps for how to fix your garage door opener.


A garage door keypad can be super handy. You can leave your house without a garage door opener, yet still feel secure in the knowledge that you’re protecting your home.

The last thing you want to deal with after a long day is a garage door code opener that just won’t work. We’ve all been there. You picked up dinner, and the kids are cranky from school. The only thing you want to do is kick off your shoes, get food on the table, and decompress. You tap in the code to your garage keypad, but instead of the door opening, you get—silence. What to do when your garage door opener is not working?

1. Replace the Battery 

It seems like a no-brainer, but it’s one that’s easy to overlook. Before you start fussing around with changing your garage door code or other complicated fixes, try changing the garage door keypad battery. Most models will use either a 9-volt or a 12-volt battery size, which you can usually find at your local hardware store. 

If you change the battery and the garage keypad still doesn’t work, then you might need to program your garage door keypad again. You might even need to go so far as clearing the memory and resetting the PIN. 

2. Check for Frayed Wiring Inside the Keypad 

The most common cause of trouble with garage door keypads is frayed connections inside the remote. If you’re having problems with one or more specific keys, it’s likely that some frayed wiring inside the remote is the culprit.  

Open up your garage door keypad and look for frayed wires or loose connections between the wires and the keys. Detach any loose or frayed wires completely and then reattach them to the keys in question. Do this one wire at a time so you don’t get mixed up. Make sure the connections are secure before you put the remote back together. (No need to worry about getting shocked. These wires have very low voltage.) 

3. Give the Keypad a Good Cleaning 

Sometimes, something as simple as a good scrub is needed. If keys are getting stuck on your remote when you press them, chances are you need to give the remote a thorough cleaning to remove grime, oil, and debris that can gum up the works. Wipe off the outside of your garage door remote with some appliance cleaner on a rag. Carefully clean between the keys. 

Next, open up your garage door opener remote and clean the inside. Sweep out dust with a soft brush. If possible, remove the keypad from the remote entirely and clean the whole thing. Take care to put the keys back in their proper position when you reassemble the remote. Take some pictures with your phone before you disassemble the remote so you don’t forget what position the keys were in.  

See? A little elbow grease can really come in handy. 


Thinking about coverage?

Sounds like a plan. Find the warranty that fits you best.

4. Reset Your PIN 

If you’re having trouble getting your garage door opener to accept your PIN, rather than repeatedly punching the digits into the keypad, stay calm and read on. Punching in too many key combos could cause the garage door opener to lock—and your blood pressure to go up. Unfortunately, the rejection of your PIN may mean you’ll have to reset it anyway.  

If you can’t open the door from the outside, but you can use the garage code to close it from the inside, this is usually an indicator that your password has expired and it’s time to change the garage door opener code. For most models, you’ll start by getting out your owner’s manual and looking for the unlocking code, which is usually four digits long. Enter the unlocking code, and when the light on the motor starts blinking, press the release button on the unit and reset your PIN according to the manufacturer’s instructions.  

Can’t seem to find your owner’s manual? It happens. Often the manufacturer's website will have directions on how to change the garage code. If that doesn’t work, pull up a how-to video online. 

5. Reboot the Garage Door Opener 

As a last resort, if you can’t get your garage door opener keypad to work or you’re having persistent problems with the system, you may want to reboot the whole thing. Want to know how to reset your garage door opener? Rejoice, because this part is easy! Simply turn off your garage door opener and unplug it for five minutes. This should erase any data in the memory and allow you to start fresh. 

Need dinner on the table in five and not ready to undertake these steps quite yet? We also have tips on how to manually open your garage door, so you can get into your home in no time. 

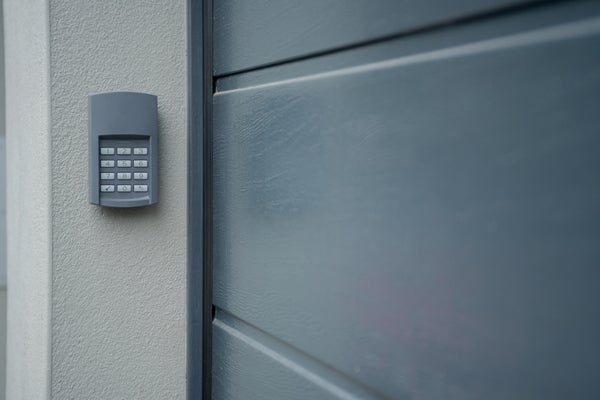
Is It Time for a New Garage Keypad? 

Before you start troubleshooting, inspect the garage door keypad for cracks, damaged or missing keys, or other signs that it’s time for replacement. Many companies make universal garage door keypads that will work with any garage door opener, so you don’t have to install a new system just because your keypad has worn out.  

Whenever a home system or appliance breaks down or starts acting up, trying to get to the bottom of it yourself is often your first instinct—and for good reason. If you can figure out the fix yourself, you might save time and money. When troubleshooting doesn’t get the job done, American Home Shield is here to help with home service plans that cover many of the home appliances and systems you use every day. Once you’re a member, help is just a service request away.  

We even have many suggestions for easy garage door DIY fixes and what to do if wacky things start happening, like your garage opening by itself. When frustrating things happen, American Home Shield is here to help you with the hard stuff. Count on us.

Share:

AHS assumes no responsibility, and specifically disclaims all liability, for your use of any and all information contained herein.

American home shield short logo mark

Don't worry. Be warranty.

Have a plan for your home when things don't go according to plan

Shop Home Warranties